Basic HTML Version


Ecrin v4.12 - Doc v4.12.02 - © KAPPA 1988-2009
Rubis Guided Session #1
• Rub
GS01 - 16/33
Proceed similarly to create the second vertical well on I02. You may now either double-click on
any well on the 2-D Map or select the “Wells” button
in the
page to
access the “Reservoir – Wells” dialog:
Fig. B04.2 • Reservoir – Wells dialog
Rename the wells with the names displayed in the bitmap- P01 for the eastern
well, and I02 for the one in the western part of the reservoir – you can
achieve this by editing directly the well name in the corresponding table
column:
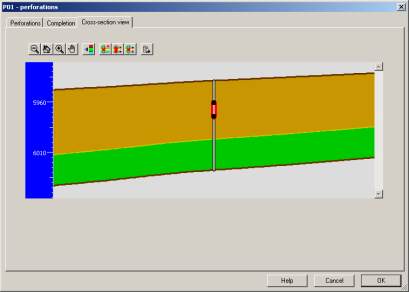
B04.2 • Perforations and Controls for P01
Click on the first line in the table to select the P01 well (the line will be highlighted in blue),
and then click on the “Perforations” button
. In the following dialog make the
“Cross-Section View” tab active and click on
in the plot toolbar to create interactively a
unique perforation located in the top (Sand) layer, by click and drag:
Fig. B04.3 • Perforating P01 in the Sand layer